Recommended
Windows App
Download the main NexMacro configuration app for Windows. Use this for profiles, key mapping, RGB, firmware tools, display settings, and named pipe service.
Setup, configuration, open-source software, icons, scripts, RGB lighting, live PC stats, firmware updates, and troubleshooting for the NexMacro 12-key programmable macro pad with 2 rotary knobs and display.
Install the NexMacro configuration app for your operating system, view the platform repositories, and download the separate PC Status Monitor app for live system information.
Download the main NexMacro configuration app for Windows. Use this for profiles, key mapping, RGB, firmware tools, display settings, and named pipe service.
Download the separate monitor app used for live CPU, GPU, fan, disk, network, and uptime data. Enable named pipe service in the main NexMacro app first, then run this app as administrator.
NexMacro software for macOS is planned. Windows is currently the recommended version for full setup, profiles, firmware tools, display settings, and live system stats.
NexMacro software for Linux is planned. Windows is currently the recommended version for full setup, profiles, firmware tools, display settings, and live system stats.
Download official NexMacro firmware files. Each release includes the required .bin firmware file and matching .json configuration file.
Recommended stable release for current NexMacro devices.
Recommended stable release for current NexMacro devices.
Recommended stable release for current NexMacro devices.
Previous stable release kept available for rollback and recovery.
Older release for legacy testing and compatibility checks.
Archived version kept for older setups and recovery use.
Legacy firmware release retained for troubleshooting older devices.
NexMacro is a 12-key programmable macro pad with 2 rotary knobs and a display. It is designed for creators, developers, gamers, streamers, students, and productivity users who want faster control over their desktop setup without relying only on menus, mouse movement, or memorised shortcuts.
This manual covers the core setup process, software use, RGB control, icon customisation, background images, scripts, firmware updates, factory reset, and troubleshooting.
Assign actions to physical keys so repeated tasks are only one tap away.
Use the display to show profiles, icons, backgrounds, shortcuts, and system information.
Use open-source software and official GitHub releases for updates, issues, and improvements.
NexMacro combines programmable mechanical keys, rotary controls, and visual display feedback in one compact control surface. The 12 keys are suited to shortcuts, text, scripts, media controls, profile changes, and app actions. The two knobs are suited to volume, scrolling, zooming, timeline movement, brush size, tab switching, and other continuous controls.
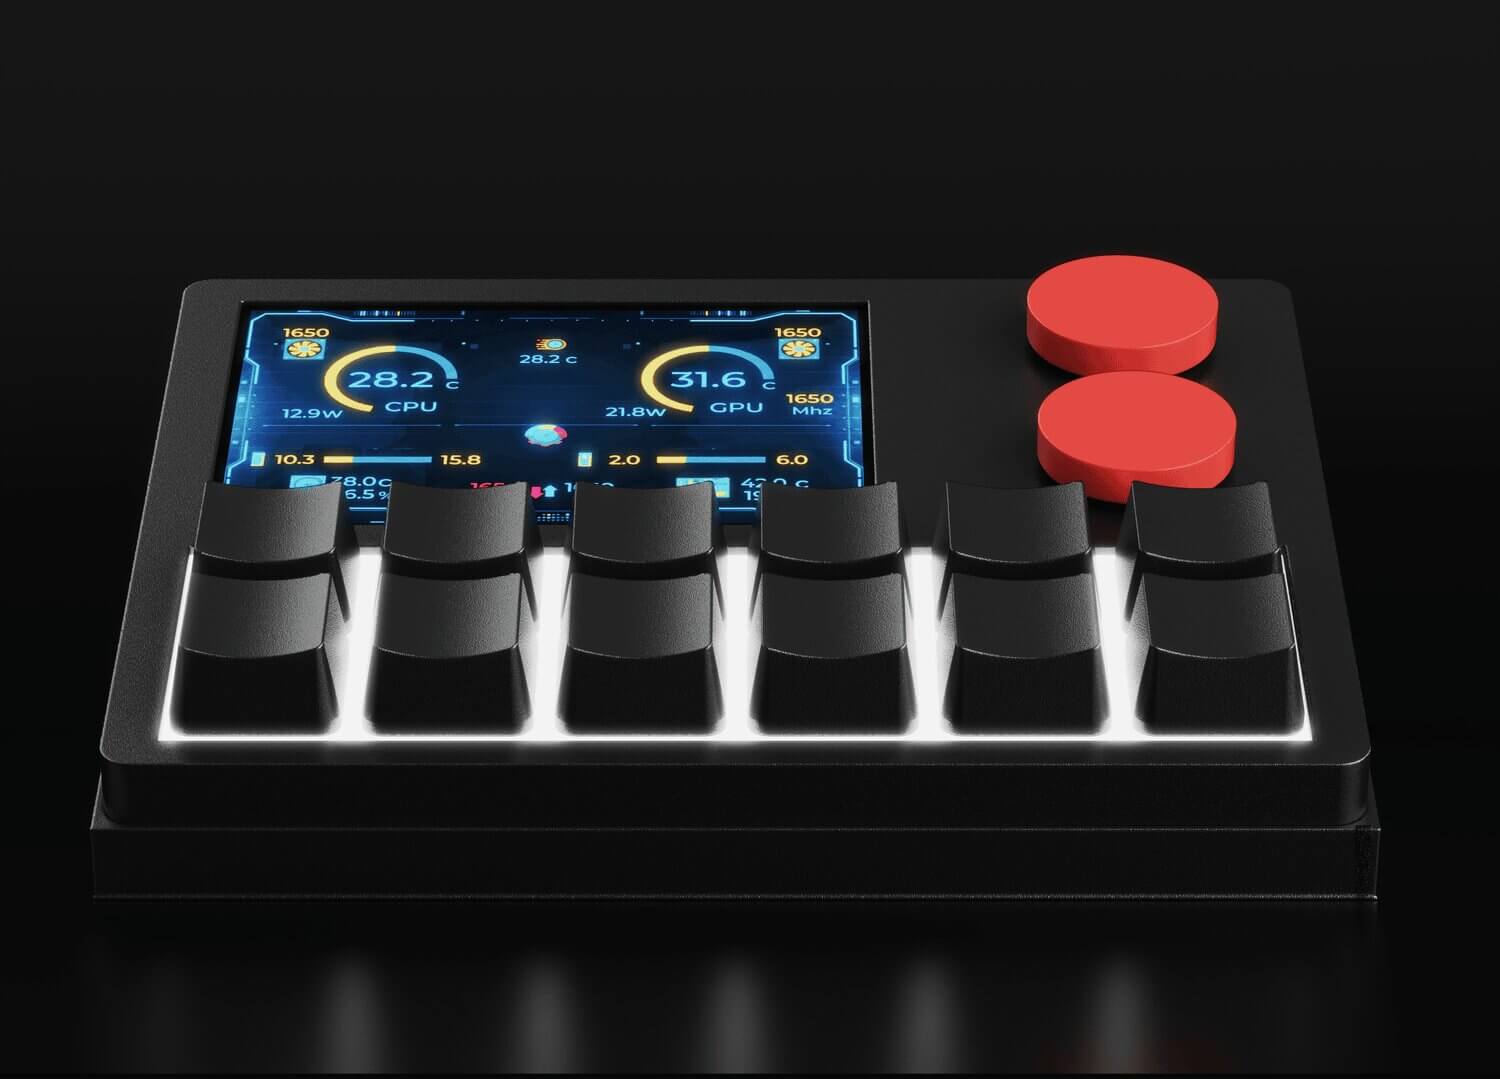
| Specification | Details |
|---|---|
| Product | NexMacro 12-Key Programmable Macro Pad with Display |
| Keys | 12 programmable mechanical keys |
| Rotary Controls | 2 rotary knobs with rotation and press input |
| Display | Large colour display for profiles, icons, labels, backgrounds, and system information |
| Interface | USB-C data connection |
| Power | USB bus-powered |
| Profiles | Multiple programmable profiles supported through software |
| Actions | Shortcuts, scripts, text input, media controls, mouse actions, profile changes, app actions, and macros |
| PC Status Monitoring | Supported through compatible NexMacro companion software |
| Software | Open-source NexMacro configuration software and official release tools |
| Operating Systems | Windows, macOS, Linux, and HID-compatible systems depending on feature mode |
NexMacro works as a USB input device. Basic keyboard, mouse, and media actions can work through standard HID-style input. Advanced features such as app launching, live PC stats, firmware updates, display syncing, and some automation features may require the NexMacro configuration app or companion software.
Recommended for the full feature set, including live PC stats, firmware updates, and app actions.
Suitable for standard shortcuts, media controls, profile use, and supported configuration features.
Suitable for HID-style inputs and supported open-source workflows depending on software support.
Start simple. Assign one key to copy, one key to paste, one knob to volume, and one key to switch profiles. Once this works, move into scripts, icons, app launching, RGB, backgrounds, and live PC stats.
On Windows, some functions require extra permissions. Run the NexMacro configuration app as administrator when using firmware updates, PC status monitoring, app launching, local file actions, or advanced system-level controls.
The configuration app is used to assign keys, configure knobs, create profiles, customise icons, change RGB lighting, update firmware, sync display settings, and enable advanced features.
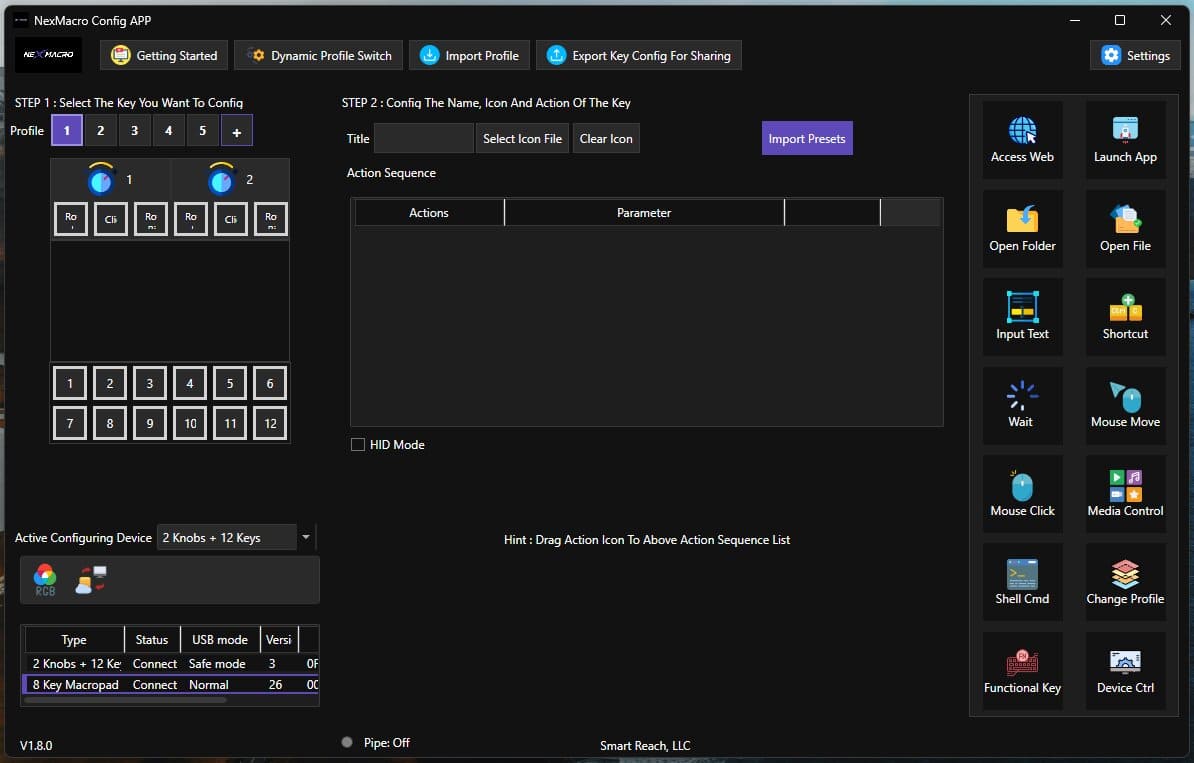
NexMacro supports RGB lighting control through the configuration app. You can change the RGB colour, choose different lighting behaviours, and save different effects per profile depending on your setup and firmware version.
The RGB settings include different trigger modes so the lighting can behave differently depending on how you want the macro pad to look on your desk.
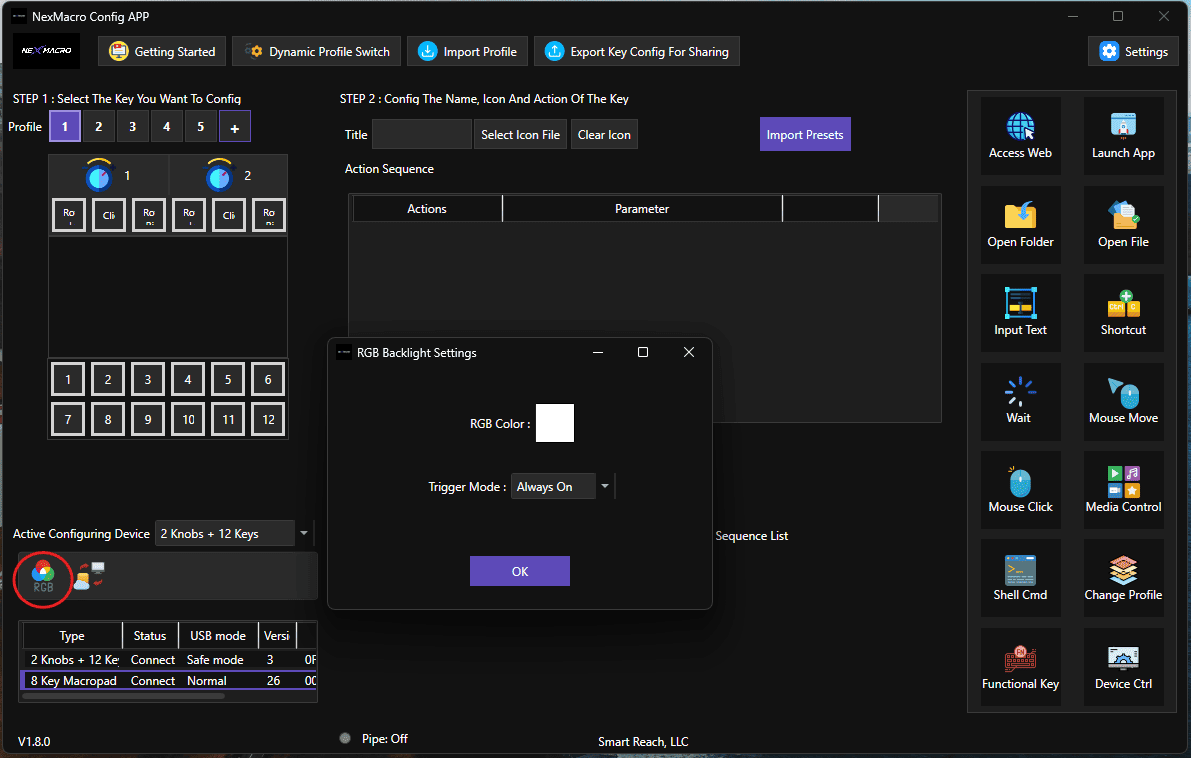
Use different RGB colours and modes for different profiles. For example, purple in Always On for everyday use, blue in Breath for creator mode, and red in When Pressing The Key for gaming mode.
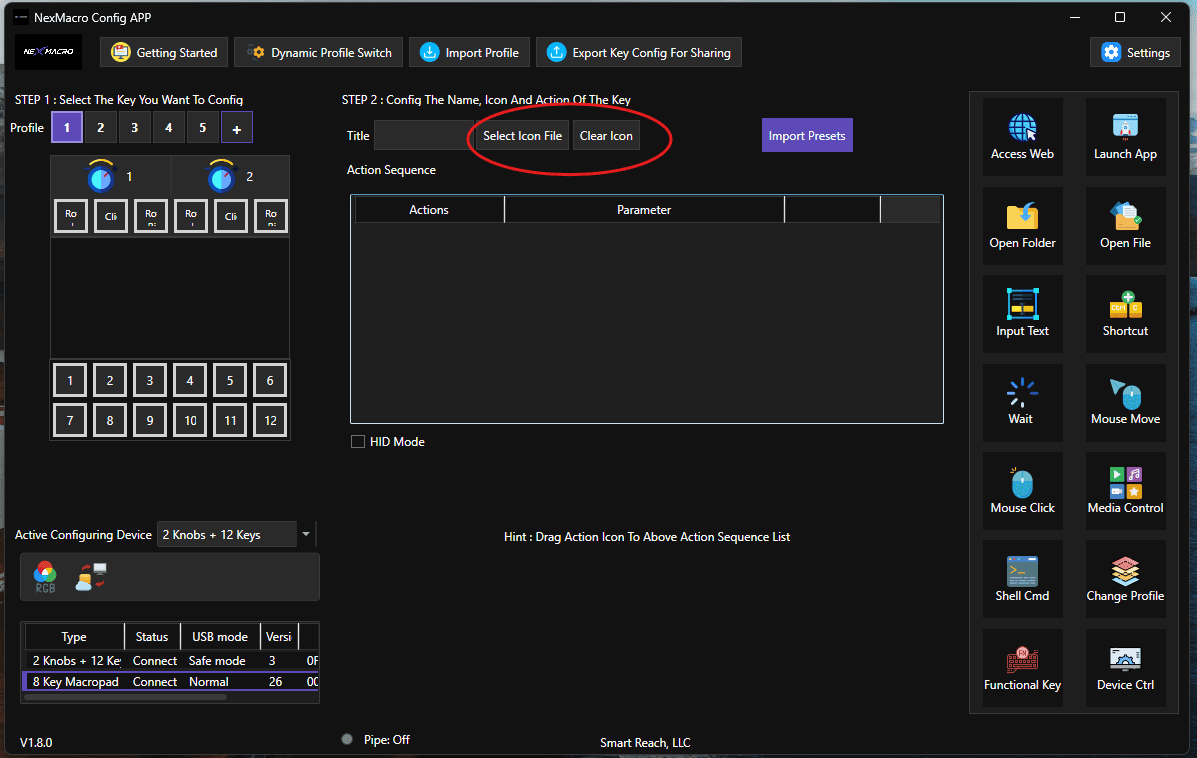
Custom icons make each profile easier to understand at a glance. You can use icons for apps, games, tools, shortcuts, scripts, media controls, or workflow categories.
NexMacro key icons must be uploaded as .png image files and should be exactly 64 × 64 pixels in size. Using the correct image size helps icons display clearly on the macro pad screen without stretching, cropping, or quality loss.
NexMacro background images are stored on the device as binary image files. To change the background, replace the existing bg_dark.bin or bg_bright.bin file inside the app_icons folder on the device mass storage.
The filename you replace depends on the theme currently used by your device. If your device is using the dark theme, replace bg_dark.bin. If your device is using the bright theme, replace bg_bright.bin.
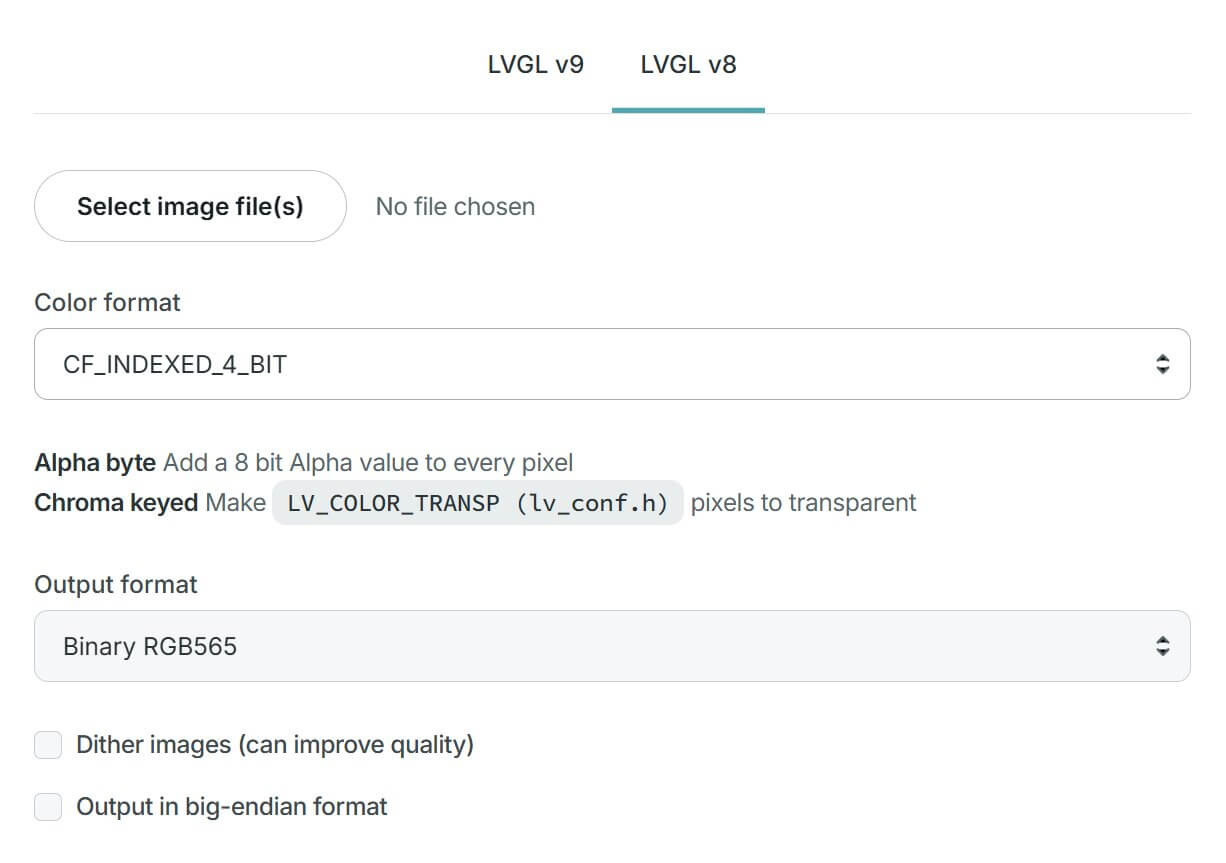
Your image must be converted into the correct LVGL binary format before it is placed on the device. Standard image files such as PNG or JPG should not be copied directly as the background file. Use the official LVGL Image Converter to convert the image first.
The background file must keep the correct filename. Use bg_dark.bin for the dark theme and bg_bright.bin for the bright theme. If the filename is different, the device may not load the new background.
PC status monitoring lets NexMacro show live system information on the device display. This feature uses a separate PC status monitor app that connects to the main NexMacro app through the named pipe service.
To use live status information, first enable the named pipe service inside the NexMacro app settings. Then open the separate PC status monitor app as administrator. Once both apps are running correctly, the monitor app will connect and send live system data to NexMacro.
Live system stats require the main NexMacro app and the separate PC Status Monitor app to communicate with each other. If live stats are not showing, confirm that Named Pipe Service is enabled in the NexMacro app settings and that the PC Status Monitor app is running as administrator.
Scripts allow a key to perform a sequence of actions, such as pressing keyboard shortcuts, typing text, opening a website, clicking the mouse, moving the cursor, waiting between actions, or switching profiles. This is useful for repetitive workflows and multi-step commands.
WINDOWS r
DELAY 500
STRING www.nexmacro.com
ENTER
WINDOWS SHIFT s
LMOUSE
REPEAT 1
Test scripts slowly before using them in important workflows. Scripts can type, click, open apps, or run shortcuts quickly, so make sure each command does exactly what you expect.
| Command | Function | Example |
|---|---|---|
| DELAY | Pauses script execution for a set number of milliseconds. | DELAY 500 |
| STRING | Types text as keyboard input. | STRING hello world |
| REPEAT | Repeats the previous script line. | REPEAT 1 |
| MOUSE_MOVE | Moves the mouse cursor by X and Y values. | MOUSE_MOVE 100 -20 |
| LMOUSE | Left mouse click. | LMOUSE |
| MMOUSE | Middle mouse click. | MMOUSE |
| RMOUSE | Right mouse click. | RMOUSE |
| GOTO_PROFILE | Switches to a specific profile index. | GOTO_PROFILE 5 |
| PREV_PROFILE | Switches to the previous profile. | PREV_PROFILE |
| NEXT_PROFILE | Switches to the next profile. | NEXT_PROFILE |
| DEFAULTDURATION | Sets the delay between pressing and releasing a single key. | DEFAULTDURATION 35 |
| DEFAULTCHARDELAY | Sets the delay between characters when typing strings. | DEFAULTCHARDELAY 35 |
| DEFAULTDELAY | Sets the delay between script lines. | DEFAULTDELAY 35 |
Default delay settings can affect future script execution and may remain stored after powering off, depending on firmware behaviour. Avoid extremely low delay values if an app or game detects very fast input as non-human input.
| Category | Supported Keywords |
|---|---|
| Modifier Keys | CONTROL, SHIFT, ALT, WINDOWS, COMMAND, OPTION |
| Navigation / Editing | ESC, ENTER, UP, DOWN, LEFT, RIGHT, SPACE, BACKSPACE, TAB, INSERT, DELETE, HOME, END, PAGEUP, PAGEDOWN |
| System Keys | PRINTSCREEN, SCROLLLOCK, PAUSE, BREAK, MENU, POWER |
| Function Keys | F1 through F24 |
| Media Keys | VOLUP, VOLDOWN, MUTE, PREV, NEXT, PP, STOP |
| Numeric Keypad | NUMLOCK, KP_SLASH, KP_ASTERISK, KP_MINUS, KP_PLUS, KP_ENTER, KP_DOT, KP_EQUAL, KP_0 through KP_9 |
| Function | Script |
|---|---|
| Copy | CONTROL c |
| Paste | CONTROL v |
| Task Manager | CONTROL SHIFT ESC |
| Windows Screenshot | WINDOWS SHIFT s |
| Open Run Dialog | WINDOWS r |
Firmware updates can add features, improve compatibility, fix bugs, and improve device behaviour. Always use the latest official NexMacro firmware files when updating the device.
A factory reset is not normally required for a firmware upgrade. Only use factory reset in an emergency situation, such as when the device cannot boot correctly because of incorrect icon files, background files, or other broken device storage files.
The root directory means the first/main folder that opens when you access the NexMacro device disk. Do not place the .bin or .json firmware files inside the app_icons folder or another subfolder unless official instructions specifically say to do so.
Local configuration means editing and saving your device setup directly from your computer without relying on cloud-based configuration. This is useful for privacy, faster testing, offline setup, or developer workflows.
A factory reset can help when profiles, display settings, RGB settings, scripts, or saved layouts are not working as expected. Resetting may remove saved profiles and custom settings, so export your configuration first if possible.
Factory reset will remove custom profiles, icons, RGB settings, scripts, display backgrounds, and saved layouts. Export your setup before resetting if you want to restore it later.
Macro pads can send keyboard, mouse, and shortcut inputs quickly. Only download software, firmware, presets, and scripts from trusted NexMacro sources. Be careful with scripts from unknown users because scripts may type commands, open websites, launch apps, or perform repeated actions.
Use official NexMacro channels for software downloads, GitHub releases, presets, firmware updates, setup guides, troubleshooting, and community help.
.png)